Colony.Pico is my Github repository for Raspberry Pi Pico projects that are built using the Raspberry Pi Pico C/C++ SDK and the Colony.Core C++ Class library.
Warning: this is a detailed nerd posting!
What is the Raspberry PI Pico? The Raspberry PI Pico is a tiny, fast, and versatile board built using RP2040, a microcontroller designed by Raspberry Pi in the UK. The RP2040 is a dual-core ARM based microcontroller and as far as general-purpose microcontrollers go — the RP2040 is pretty handy.
What is the Colony.Core C++ library Package? It is C++ class library that is developed specifically for embedded software development. And as such, is designed for deterministic memory management (i.e. no heap usage after startup) and the constrained (memory and CPU cycles) environment of embedded systems. Some of its features are:
- Provides an Operating System Abstraction Layer (OSAL) that decouples the application from the target hardware/operating-system.
– Threads
– Mutexes
– Semaphores
– Thread Local Storage
– Elapsed Time
– Event flags (up to 32 flags per thread).
– Software timers
– Global Lock (thing disable/enable interrupts) - Message based Inter-Thread-Communications (ITC)
- Data Model changed notifications
- Cooperative monotonic periodic scheduling
- Data Model framework
The Data Model software architecture pattern is a data-oriented pattern where modules interact with each other via data instances (a.k.a. model points) with no direct dependencies between modules. - Containers that support unlimited number of elements with no dynamic memory allocation.
- A text-based command shell framework that can be used to interact with an application at runtime via an IO stream (e.g. UART, stdio, etc.)
- Text handling methods and String classes that do not use dynamic memory allocation.
Extending Colony.Core C++ class library
First things first. The library provides an implementation of the OSAL using FreeRTOS, but I am only working the C/C++ SDK provided by the Raspberry foundation. I could have go and pulled down the FreeRTOS port for the RP2040 (which supports Symmetric Multiprocessing) but where would the fun be in at? So I decided why not implement the Colony.Core’s OSAL to run directly on top the Pico’s C/C++ SDK where each core maps one-to-one with a thread. Look Mom, concurrent threading with no RTOS! Below are some of the details of that effort:
RP2040 OSAL Details:
- Threads — The first thread created runs on core0. A single additional thread can be created that runs on core1.
- Mutexes — Fully functional. Note: The memory for the internal Mutex type is allocated from the Heap.
- Global Lock — The GlobalLock maps the RP2040 SDK’s critical section. There are some subtle details here — but it effective disables IRQs on the calling core AND provides mutual exclusion with respect to the other core.
- Semaphores — Fully functional. Note: The memory for the internal Semaphore type is allocated from the Heap.
- Thread Local Storage — Fully functional.
- Elapsed Time — Fully functional.
- Event Loop — Fully functional. This includes Event Flags and Software Timers.
- Periodic Scheduling — Fully functional.
Application Start-up sequence:
- MCU Resets.
- Core0 begins executing. Core1 is in the sleep state.
- The bootloader(s) execute and transfer execution to the Application.
- The Application’s C/C++ start-up code executes (e.g. crt0, low-level SDK initialization, etc. ).
- The Application’s C/C++ main() method is called.
a) At this point the system is a bare metal system with interrupts disabled.
b) The application code should call Cpl::System::Api::initialize() ASAP.
c) The application should complete any required HW/BSP/App initialization that needs to occur before ‘thread scheduling’ begins.
d) The Application needs to call Cpl::System::Thread::Create() to create at least one ‘thread’. The application can create at most two ‘threads’. The first thread created will execute on CORE0, the second thread executes on CORE1 - The Application ‘starts threading’ by calling Cpl::System::Thread::enableScheduling().
- Once the ‘threading’ has been enable, the Application can optional create the second thread assuming only 1 thread was created prior to enableScheduling() call.
Notes:
- The second thread can be forcibly stopped (i.e. CORE1 put into the sleep state) by calling Cpl::System::Thread::destroy(). If the second thread terminated itself, i.e. the Runnable object ran to completion, CORE1 will be put into the sleep state.
- A second thread can be created ‘again’ after destroy() has been called.
- Calling destroy() on the first thread has NO effect.
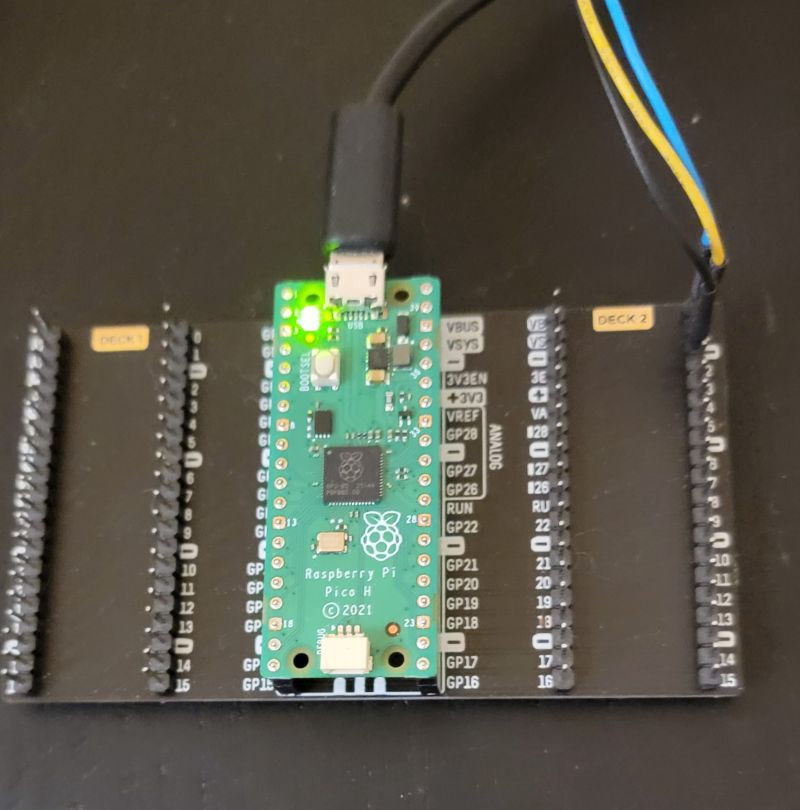
Example Threading project
The example project located in the repository under the projects/example/cpl_2threads/ directory is a simple blinky-LED application with a command shell that uses two threads.
The application blinks the Pico board’s LED at a runtime settable frequency and optionally outputs status messages every time the LED state is toggled. The LED application code executes on core0. The application also contains the Colony.Core’s ‘TShell’ command processor (think Debug console) that runs over the UART0 or stdio-over-USB provided by the SDK. The TShell command processor executes on core1.
The LED flash frequency and the terse/verbose state of the application is set by the developer entering TShell commands to set/change the LED timing and the terse/verbose state.
Below is example output of the application (using UART0 for command processor). The dm write … lines are debug commands entered by the developer.
**** APPLICATION START-UP *****
Cpl and the Bsp have been initialized.
Launching unit tests...
>> 00 00:00:00.000 (app) [core0] Hello.  I am the Bob example application.
>> 00 00:00:00.000 (app) [APP-BOB] Enabling scheduling
--- Your friendly neighborhood TShell. ---
$ >> 00 00:00:00.001 (app) [APP-BOB] Bob:delayModelPointChange()
>> 00 00:00:00.004 (app) [APP-BOB] Bob:verboseModelPointChange()
dm write {name:"delayTime",val:1000}
dm write {name:"verbose", val:true}
$ >> 00 00:00:26.087 (app) [APP-BOB] Bob:delayModelPointChange()
$ >> 00 00:00:26.090 (app) [APP-BOB] Bob:verboseModelPointChange()
>> 00 00:00:27.000 (app) [APP-BOB] Bob: edge counter=106
>> 00 00:00:28.000 (app) [APP-BOB] Bob: edge counter=107
>> 00 00:00:29.000 (app) [APP-BOB] Bob: edge counter=108
>> 00 00:00:30.000 (app) [APP-BOB] Bob: edge counter=109
dm write {name:"verbose", val:false}
$ >> 00 00:00:30.708 (app) [APP-BOB] Bob:verboseModelPointChange()
dm write {name:"delayTime",val:500}
dm write {name:"verbose", val:true}
$ >> 00 00:00:36.754 (app) [APP-BOB] Bob:delayModelPointChange()
$ >> 00 00:00:36.757 (app) [APP-BOB] Bob:verboseModelPointChange()
>> 00 00:00:36.800 (app) [APP-BOB] Bob: edge counter=116
>> 00 00:00:37.300 (app) [APP-BOB] Bob: edge counter=117
>> 00 00:00:37.800 (app) [APP-BOB] Bob: edge counter=118
>> 00 00:00:38.300 (app) [APP-BOB] Bob: edge counter=119
>> 00 00:00:38.800 (app) [APP-BOB] Bob: edge counter=120
>> 00 00:00:39.300 (app) [APP-BOB] Bob: edge counter=121
>> 00 00:00:39.800 (app) [APP-BOB] Bob: edge counter=122
>> 00 00:00:40.300 (app) [APP-BOB] Bob: edge counter=123
>> 00 00:00:40.800 (app) [APP-BOB] Bob: edge counter=124
dm write {name:"verbose", val:false}
$ >> 00 00:00:41.018 (app) [APP-BOB] Bob:verboseModelPointChange()
Code Snippets
The example application was fairly simple and quick to create once the Colony.Core Cpl C++ class library was extended to support the RP2040 MCU. Here is code for main() and the runApplication() method it calls. The core0MBox_ and core1Mbox_ objects are Cpl::System::Runnable instances (think the main/forever loop for each thread).
int main(void)
{
    // Initialize CPL
    Cpl::System::Api::initialize();
    // Initialize the board
    Bsp_Api_initialize();
    // Enable Tracing
    CPL_SYSTEM_TRACE_ENABLE();
    CPL_SYSTEM_TRACE_ENABLE_SECTION( MY_APP_TRACE_SECTION );
    CPL_SYSTEM_TRACE_SET_INFO_LEVEL( Cpl::System::Trace::eINFO );

    // Start the Console/Trace output: Accepting the default UART Config parameters, e.g.   115200, 8N1
    Cpl::System::RP2040::startConsole();
    Cpl::System::RP2040::getConsoleStream().write( "\n**** APPLICATION START-UP *****\n" );
    Cpl::System::RP2040::getConsoleStream().write( "Cpl and the Bsp have been initialized.  \n" );
    // Set the stream of the console
    g_consoleInputFdPtr  = &(Cpl::System::RP2040::getConsoleStream());
    g_consoleOutputFdPtr = &(Cpl::System::RP2040::getConsoleStream());
    // Start the application
    runApplication();         // This method should never return
}
void runApplication()
{
    CPL_SYSTEM_TRACE_MSG( MY_APP_TRACE_SECTION, ("Hello.  I am the Bob example application.") );
    // Create mock application thread
    Cpl::System::Thread::create( core0Mbox_, "APP-BOB" );
    // Create a 'Scheduler' thread for the TShell to run in
    Cpl::System::Thread::create( core1Mbox_, "TSHELL" );
    // Start scheduling
    CPL_SYSTEM_TRACE_MSG( MY_APP_TRACE_SECTION, ("Enabling scheduling") );
    Cpl::System::Api::enableScheduling();
}
The files containing these function are:
Caveat: Simple and quick are relative terms. For someone unfamiliar with the Colony Core C++ Class library there is nothing simple or quick about creating this example application. The moral of the story here is that while Colony Core has reasons-to-it-madness — it does have learning curve. Did I mention that there is book that will help with the concepts ;-).