
The TShell example project is an introduction to using the TShell framework. A brief overview to the TShell can be found here.
The example illustrates the following:
- Creating a custom command
- Creating a blocking shell that uses a dedicated thread
- Creating a non-blocking shell that shares the Application thread
- Creating a blocking shell that uses TCP sockets for the stream IO.
Note: The example is built with the default no security options.
Example Application
The example application contains the following modules/classes. Note: the goal of the application is to illustrate how to use TShell, not to do anything that is useful ;-).
BobModule. The Bob Module is representative of an Application or sub-system, i.e. something for a shell command to interact with. The module increments a counter every N msecs and echoes the counter value to the CPL Trace engine (when enabled).
| Model Point | Type | Description |
|---|---|---|
mp::bobsDelayMs | Cpl::Dm::Mp::Uint32 | The delay time, in milliseconds, for incrementing the module’s counter |
mp::enableBobsTrace | Cpl::Dm::Mp::Bool | Flag to enable/disable the module’s trace output |
- Files:
BobModule.h
BobCommand. The Bob Command is a custom TShell command that controls the runtime behavior of the Bob Module.
- Files:
BobCommand.h
ModelPoints. The Model Points module defines all of the model points used by the Application. All of the model points are statically allocated in the invalid state.
- Files:
ModelPoints.h,ModelPoints.cpp
TShell Framework. The TShell framework from the Cpl C++ Class library .
- Directory:
Cpl/TShell/
Main. The Main module is responsible for constructing all of the modules and/or classes along with the start-up and shutdown logic. And orderly shutdown of the application is triggered by the calling the Cpl::System::Shutdown::success() method (which can be done via the bye command). This module is constructed such that it creates three different shell variants (blocking, blocking w/sockets, non-blocking) at runtime. This is done illustrate the three shell variants – it is not the recommended way to create a shell for an application. There is a total of three threads in the application:
| Thread | Description |
|---|---|
| xxxMain | This the main thread of the executable’s process. The start-up/shutdown logic executes in this thread. |
| Application | This the primary application thread and it is event/message based thread. The BobModule class executes in this thread. |
| TShell | The TShell console runs in own dedicate thread. This thread has the lowest priority. Note: This thread is not created when using the non-blocking shell. |
Platform main. The Platform main contains the Application’s main() entry function. This file is responsible for providing the platform specific IO streams, platform specific threads shell command. It is also is responsible for parsing the executable’s command line inputs that specific which shell variant (e.g. blocking, non-blocking, etc.) to create and run. The executable’s command line options are:
- Files:
winmain.h,posixmain.cpp
  TShell Example.

    Usage:
      tshell-example [options]

    Options:
      -n            Create and run a non-blocking TShell that uses STDIO for
                    the IO streams.
      -s PORT       Create and run a blocking TShell that uses TCP sockets as
                    the IO streams. The TShell is socket listener on port
                    number: PORT
      -h,--help     Show this screen.

    NOTES:
     o The default behavior is to create and run a blocking TShell that uses
       STDIO as the IO streams.
TShell Details
Commands
A Command is a concrete C++ class that implements the Cpl::TShell::Command interface. In addition, each concrete class is required (in its constructor) to self register with the shell’s command list. The following code snippet lists the methods that each command is required to implement.
/// This method executes the command.
virtual Result_T execute( Context_&        context,
                          char*            rawCmdString,
                          Cpl::Io::Output& outfd ) noexcept = 0;

/// This method returns the command's verb string
virtual const char* getVerb() const noexcept = 0;

/// This method returns the command's usage string
virtual const char* getUsage() const noexcept = 0;

/** This method returns the command's detailed help string.  Detailed
    help is optional.  If the command does not support detailed help,
    then nullptr is returned.
 */
virtual const char* getHelp() const noexcept = 0;

/** Returns the minimum required permission level needed to execute the
    command.
 */
virtual Security::Permission_T getMinPermissionRequired() const noexcept = 0;
In practice there is Cpl::TShell::Cmd::Command base class that implements the self registration of the command along with some other (minimal) boiler plate code.
execute()
The above methods are fairly self explanatory with the exception of the execute command. I’ll start with a detailed description of its arguments.
- context. The
contextargument is a reference to the framework’sContext_interface. TheContext_interface provides common infrastructure, information, buffers, etc. that facilitates interaction between the shell processor and individual commands. For example, when the command wants to output a line of text, it uses thecontext.writeFrame()method instead of directly calling
theoutfd.write()method. ThewriteFrame()method is responsible for framing the output text and ensuring that the output line operation is atomic. - rawCmdString. As the name implies this is raw text from the accepted text frame containing the complete command text. By passing the text as a
char*instead ofconst char*commands are allowed to modify the string contents (e.g. performing an in-place/destructive token parsing). - outfd. The
outfdargument is reference the shell’s output stream. In general commands should never operate directly on the output stream, but instead should use theContext_interface when outputting text.
Execution sequence
The steps for execution a command are pretty simple:
- Parse any command arguments
i. Return an error code if one or more arguments are bad and optionally generate error messages - Do the command action(s)
i. Return an error code if an error occurred and optionally generate error messages - Return the
Command::eSUCCESSon successfully completion of the command
The TShell framework itself does not provide support for parsing the raw command string. However, the CPL C++ class library provides a set of interfaces for parsing text strings. For example, the Cpl::Text::Tokenizer::TextBlock is string tokenizer that supports quoted tokens that can contain embedded quotes.
Cpl::Text::Tokenizer::TextBlock tokens( rawCmdString, context.getDelimiterChar(), context.getTerminatorChar(), context.getQuoteChar(), context.getEscapeChar() );
...
// Error checking
if ( tokens.numParameters() > 3 || tokens.numParameters() < 2 )
{
    return Command::eERROR_BAD_SYNTAX;
}
...
Cpl::Text::String& token  = context.getTokenBuffer();
token = tokens.getParameter( 1 );
Since the shell framework does not dictate how formating/parsing of command strings are done – the application can use/provide its own custom formating/parsing widgets. See the following directories for text parsing interfaces provided by CPL:
As mentioned above, commands should not directly use the outfd when generating output, and instead use the content.writeFrame() method. The writeFrame() methods do not support printf semantics. When printf semantics are desired a command can use a Cpl::Text::String instance to do the formating and then output the String’s buffer using the writeFrame() method. The Context_ interface provides shared (across all commands) Cpl::Text::String instances specifically for this purpose.
Cpl::Text::String& outBuf = context.getOutputBuffer();
...
outBuf.format( "Bob's output is: %s", traceEnabled ? "ENABLED" : "disabled" );
context.writeFrame( outBuf.getString() );
Blocking Shell
A blocking shell is where the shell framework expects reading the input stream will block until there is at least one character available. A blocking shell requires a dedicated thread. The following pseudo code illustrates how to create a blocking shell using the framework’s Maker and Stdio high level objects.
int runTheApplication( ...
                       Cpl::Io::Input&   infd,
                       Cpl::Io::Output&  outfd,
                       ... )
{
    ...
    // Create the TShell command list and commands
    Cpl::Container::Map<Cpl::TShell::Command>    cmdlist;
    Cpl::TShell::Cmd::Help                       helpCmd( cmdlist );
    ...
    // Create a BLOCKING TShell processor instance
    Cpl::TShell::Maker  blockingCmdProcessor( cmdlist );

    // Create a helper object that manages a dedicated thread for a
    // TShell processor to execute in.  The thread is created when
    // shell.launch() is called.
    Cpl::TShell::Stdio shell( blockingCmdProcessor,
                              "TShell",
                              CPL_SYSTEM_THREAD_PRIORITY_NORMAL + CPL_SYSTEM_THREAD_PRIORITY_LOWER +    CPL_SYSTEM_THREAD_PRIORITY_LOWER );
    ...
    // Start the TShell/debug-console
    shell.launch( infd, outfd );
    ...
}
Note: In the pseudo code above the shell objects are created on the stack. It is recommended that application statically allocate as many (if not all) of the shell objects.
Blocking Shell with Sockets
The Sockets case is a blocking shell as described above with the difference being on how the shell is provided its IO stream references. When a socket connection request is accepted, the shell is started and passed the connection’s IO stream handle for its input and output streams. When the shell self terminates or the connection is dropped, the thread resumes listening for socket requests.
Note: This is a use case of where a shell is started, stopped, and restarted.
int runTheApplication( ...
                       Cpl::Io::Socket::Listener&   listener,
                       int                          portNum,
                       ... )
{
    ...
    // Create the TShell command list and commands
    Cpl::Container::Map<Cpl::TShell::Command>    cmdlist;
    Cpl::TShell::Cmd::Help                       helpCmd( cmdlist );
    ...
    // Create a BLOCKING TShell processor instance
    Cpl::TShell::Maker  blockingCmdProcessor( cmdlist );

    // Create a helper object that is a TCP Socket Listener running in its
    // own thread.  The TShell process executes in the context of the Listener's
    // thread. The thread is created when shell.launch() is called.
    Cpl::TShell::Socket shell( blockingCmdProcessor,
                               listener,
                               "TShell",
                               CPL_SYSTEM_THREAD_PRIORITY_NORMAL + CPL_SYSTEM_THREAD_PRIORITY_LOWER +    CPL_SYSTEM_THREAD_PRIORITY_LOWER );
    ...
    // Start listening for connection requests.  The shell will be started
    // when a connection is established.
    shell.launch( portNum );
    ...
}
Note: In the pseudo code above the shell objects are created on the stack. It is recommended that application statically allocate as many (if not all) of the shell objects.
Non-Blocking Shell
A non-blocking shell is where the shell framework expects that read operations on the input stream will return immediately with zero or more characters read, i.e. the input stream is polled. A non-blocking shell does not require a thread which means it can be used in bare-metal application. The following pseudo code illustrates how to create a non-blocking shell that runs inside of the main forever loop.
// Create the TShell command list and commands
static Cpl::Container::Map<Cpl::TShell::Command>    cmdlist_;
static Cpl::TShell::Cmd::Help                       helpCmd_( cmdlist_ );
...
// Create a NON-BLOCKING TShell processor instance
static Cpl::TShell::PolledMaker  blockingCmdProcessor_( cmdlist_ );

int main( int argc, char* const argv[] )
{
    ...

    // Provide the IO Streams for the shell
    Cpl::Io::Input*   infd  = <....>;
    Cpl::Io::Output*  outfd = <....>;
    ...

    // Start the shell
    polledCmdProcessor_.getCommandProcessor().start( *infd, *outfd );

    // Main processing loop
    for(;;)
    {
        ...
        // Provide the TShell processor a 'timeslice' to execute
        polledCmdProcessor_.getCommandProcessor().poll();
        ...
    }
    ...
}
Note: In the example application – the non-blocking variant is more involved than the blocking variants. This is an artifact of how the CPL library supports periodic scheduling (i.e. polling) within an event thread – not because a non-blocking shell is complicated.
Maker, Stdio, Socket
The TShell framework contains several high level objects that can be used to create instances of a shell and a thread for the shell to execute in. However, applications are free to not uses any of these objects and create and manage shell instances directly.
Maker, PolledMaker. These two objects are used to create a TShell Processor instance along with the needed Input and Output stream decoders/encoders that are used to frame the input/output text.
Stdio. The Stdio object creates and manages a dedicated thread for a TShell processor instance that uses blocking semantics.
Socket. The Socket object creates and manages a dedicated tcp listener thread for a TShell processor instance that uses blocking semantics. The thread performs a blocking listen for socket connection requests. When a connection is accepted, the thread starts the shell. When the connection is
dropped or the shell self terminates – the thread resumes listening for socket connection requests.
Help
The shell framework provides basic support for run time help. What the framework does not provide is pretty or smart formatting of the help output. Individual commands provide the raw help text, but there is no formatting imposed/required for the help text. However, since the help feature is really just another command (i.e. help) – an application can create is own implementation of the help command to add the desired output format.
The default convention for the help text is for each command to format its help text so that no individual help line exceeds 80 characters.
Security
The example application does not enable/use the security features of the shell. Here is brief summary on how to enable the security feature.
- Set
OPTION_TSHELL_CMD_COMMAND_DEFAULT_PERMISSION_LEVELto something
other thanePUBLIC. This will be the permission for all legacy (i.e. non Security aware) TShell commands - Recommend turning on the switch:
USE_CPL_TSHELL_PROCESSOR_SILENT_WHEN_PUBLIC - Include the
Cpl::TShell::Cmd::Usercommand and provide an implementation of theCpl::TShell::Securityinterface (that is passed to theUsercommand’s constructor). - Optionally include new security aware commands
Installation and Setup
The source code for the Data Model example is part of the PIM repository on GitHub. The example code is functional on both a Windows and a Linux PC.
Here are the minimum prerequisites for both Windows and Linux:
- Python 3.6 or newer.
- At least one compiler installed. Supported compilers are:
- GCC under Linux
- Visual Studio VC12 (or higher) under Windows
- MinGW GCC Compiler under Windows.
- Git client installed. This is optional if, instead of cloning the repository,
you want to work with a downloaded zip file from GitHub.
Once the everything is installed/downloaded to your box, open a terminal window and navigate to the root of your local GIT repository and run the env.bat or env.sh script to setup the compiler toolchain. For example under Windows using the VC compiler:
c:\_workspaces\zoe\pim>env
NO TOOLCHAIN SET

1 - GCC-ARM compiler for Grand Central BSP 1.5.7
2 - GCC-ARM compiler for Grand Central BSP 1.6.0
3 - GCC-AVR cross compiler for Atmel AVR/arduino
4 - GCC-RX cross compiler for Renesas RX
5 - MINGW64 v9.2.0 compiler for Windows
6 - GCC-ARM Cortex M/R cross compiler for NRF52/Arduino
7 - Visual Studio VC16 (32bit) compiler for Windows
8 - Visual Studio VC16 (64bit) compiler for Windows

c:\_workspaces\zoe\pim>env 7
**********************************************************************
** Visual Studio 2019 Developer Command Prompt v16.8.3
** Copyright (c) 2020 Microsoft Corporation
**********************************************************************
[vcvarsall.bat] Environment initialized for: 'x86'

c:\_workspaces\zoe\pim>Notes:
- Running the
env.bat|shscript only needs to be run once per terminal window/session. - All builds are command line based and use the PIM repository’s
nqbpbuild engine.
Building the Example Application
The PIM repository directory structure separates the source code directories from the directories where the builds are performed. In the following top-level directory structure, application builds and unit tests are built in the projects/ and tests/ directory trees, respectively. The source code resides under the src/ or xsrc/ directory trees.
<workspace root>
├─── docs
├─── projects   ; Build applications/released images
├─── resources
├─── scripts
├─── src
├─── tests      ; Build unit tests
├─── top
└─── xsrc       ; Contains the NQBP build engine (among other things)
The Application specific source code the example application is located in project/Examples/TShell/ directory. The location of the example source code does not follow the paradigm for locating application source code under the src/ directory. This exception was done to simplify the example. See the projects under the projects/Storm/ directory for the recommended file/directory structure.
To build the example application navigate to a leaf directory inside of the project/Examples/TShell/
directory and run the nqbp.py script. Which leaf directory depends on which host-platform/compiler you are using.
The following is an example of building and running the executable on Windows using the Visual Studio compiler (note: the -g -t options enable the debug and parallel build options respectively).
c:\_workspaces\zoe\pim>cd projects\Examples\TShell\windows\vc12
c:\_workspaces\zoe\pim\projects\Examples\TShell\windows\vc12>nqbp.py -gt
================================================================================
= START of build for:  tshell-example.exe
= Project Directory:   C:\_workspaces\zoe\pim\projects\Examples\TShell\windows\vc12
= Toolchain:           VC++ 12, 32bit (Visual Studio 2013)
= Build Configuration: win32
= Begin (UTC):         Sun, 15 Jan 2023 14:07:00
= Build Time:          1673791620 (63c40884)
================================================================================
= Cleaning Built artifacts...
= Cleaning Project and local Package derived objects...
= Cleaning External Package derived objects...
= Cleaning Absolute Path derived objects...
=====================
= Building Directory: src\Cpl\Text\Frame
=====================
= Building Directory: src\Cpl\Text\Tokenizer
=====================
= Building Directory: src\Cpl\Memory
=====================
= Building Directory: src\Cpl\Container
=====================
= Building Directory: src\Cpl\Checksum
=====================
= Building Directory: src\Cpl\Text
=====================
= Building Directory: src\Cpl\Io
cdlist.c
Pool_.cpp
Decoder_.cpp
TextBlock.cpp
Basic.cpp

...

StdOut.cpp
=
= Archiving: library.lib
=====================
= Building Project Directory:
ModelPoints.cpp
Main.cpp
winmain.cpp
=====================
= Linking...
================================================================================
= END of build for:    tshell-example.exe
= Project Directory:   C:\_workspaces\zoe\pim\projects\Examples\TShell\windows\vc12
= Toolchain:           VC++ 12, 32bit (Visual Studio 2013)
= Build Configuration: win32
= Elapsed Time (hh mm:ss): 00 00:26
================================================================================
c:\_workspaces\zoe\pim\projects\Examples\TShell\windows\vc12>_win32\tshell-example.exe

--- Your friendly neighborhood TShell. ---


$ help
bob on|off
bob on|off delay
bye [app [<exitcode>]]
dm ls [<filter>]
dm write {<mp-json>}
dm read <mpname>
dm touch <mpname>
help [* | <cmd>]
threads
tprint ["<text>"]
trace [on|off]
trace section (on|off) <sect1> [<sect2>]...
trace threadfilters [<threadname1> [<threadname2>]]...
trace level (none|brief|info|verbose|max)
trace here|revert
$ bob on
Bob's output is: ENABLED
$
>> 00 00:00:30.183 (bob) Bob's counter: 30
>> 00 00:00:31.188 (bob) Bob's counter: 31
>> 00 00:00:32.193 (bob) Bob's counter: 32
>> 00 00:00:33.202 (bob) Bob's counter: 33
>> 00 00:00:34.210 (bob) Bob's counter: 34
>> 00 00:00:35.213 (bob) Bob's counter: 35
bob on 500
Bob's output is: ENABLED
Bob's delay set to: 500 msecs
$
>> 00 00:00:35.805 (bob) Bob's counter: 36
>> 00 00:00:36.311 (bob) Bob's counter: 37
>> 00 00:00:36.822 (bob) Bob's counter: 38
>> 00 00:00:37.334 (bob) Bob's counter: 39
>> 00 00:00:37.844 (bob) Bob's counter: 40
>> 00 00:00:38.357 (bob) Bob's counter: 41
>> 00 00:00:38.869 (bob) Bob's counter: 42
>> 00 00:00:39.377 (bob) Bob's counter: 43
>> 00 00:00:39.887 (bob) Bob's counter: 44
>> 00 00:00:40.396 (bob) Bob's counter: 45
bob off
Bob's output is: disabled
$
Running the Example
The example supports creating and running a blocking shell, a blocking shell with sockets, and non-blocking shell. The shell variant is selected when the user launches the executable. The command line options are:
c:\_workspaces\zoe\pim\projects\Examples\TShell\windows\vc12>_win32\tshell-example.exe -h
TShell Example.

    Usage:
      tshell-example [options]

    Options:
      -n            Create and run a non-blocking TShell that uses STDIO for as
                    the IO streams.
      -s PORT       Create and run a blocking TShell that uses TCP sockets as
                    the IO streams. The TShell is socket listener on port
                    number: PORT
      -h,--help     Show this screen.

    NOTES:
     o The default behavior is to create and run a blocking TShell that uses
       STDIO as the IO streams.
When the executable is launched with no options or with the -n option, the run time behavior is the same. The only difference is what the threads command reports.
Blocking case: tshell-example.exe
c:\_workspaces\zoe\pim\projects\Examples\TShell\windows\vc12>_win32\tshell-example.exe

--- Your friendly neighborhood TShell. ---


$ threads

Name              R  ID        Native Hdl  Pri  User Time     Kernel Time
----              -  --        ----------  ---  ---------     -----------
Win32Main         Y  000062FC  000000F0      0  00:00:00.031  00:00:00.000
Application       Y  00005C4C  00000114      0  00:00:00.000  00:00:00.000
TShell            Y  00005D50  00000128     -2  00:00:00.000  00:00:00.000

Total number of threads: 3
$
Non-blocking case: tshell-example.exe -n
c:\_workspaces\zoe\pim\projects\Examples\TShell\windows\vc12>_win32\tshell-example.exe -n
--- Your friendly neighborhood TShell. ---
$ threads
Name R ID Native Hdl Pri User Time Kernel Time
---- - -- ---------- --- --------- -----------
Win32Main Y 000042D4 000000F0 0 00:00:00.015 00:00:00.000
Application Y 00001374 00000114 0 00:00:00.015 00:00:00.000
Total number of threads: 2
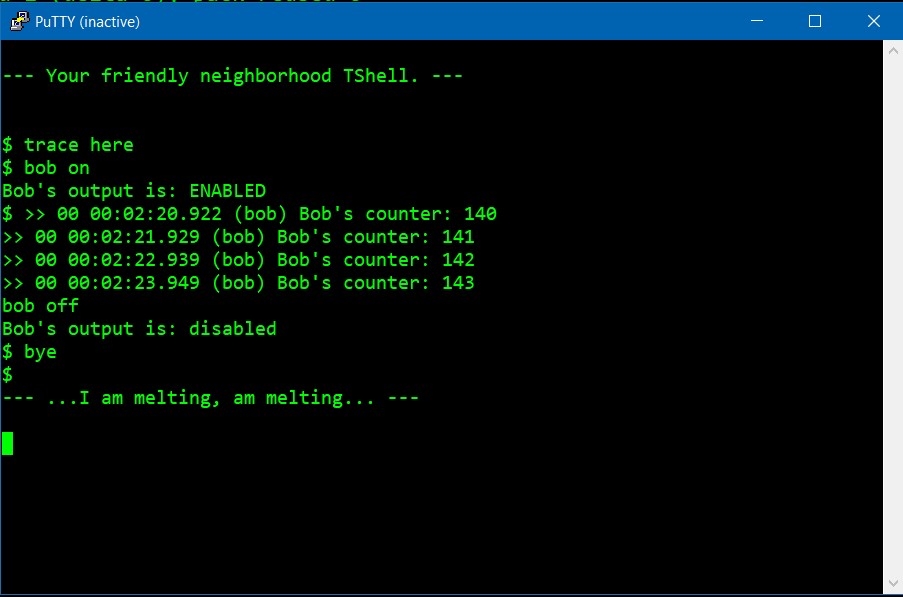
$When running the executable to use sockets (i.e tshell-example.exe-s 5002)
there are some differences.
- A terminal emulator application (e.g. Putty) is required to connect to the application’s shell.
- The application’s trace output is routed to the command line console. This means that when you issue a
bob oncommand you will not see the trace output in your terminal emulator (Putty) window. You can issue a thetrace herecommand to redirect the application’s trace output to the shell’s output stream.- The ability to redirect the trace output is artifact of the
tracecommand’s
implementation and functionality provided by the CPL Trace interface.
- The ability to redirect the trace output is artifact of the
- Issuing the
byecommand without any arguments will terminate the socket connection. After terminating the connection, you can reconnect to the shell using your terminal emulator (Putty).